WHEN I first entered a weight room with my friend Manuel, the first exercise we did was dumbbell chest press and he handed me the 25lb. dumbbells and said, “let’s do 3 sets of 8.” After looking at him dumbly, he explained what he meant and we got started on our 1st of 3 sets in which we would perform 8 repetitions of the exercise known as dumbbell chest press.
Little did either of us know, 25 lb. dumbbells were going to be a LITTLE too much for me, until we g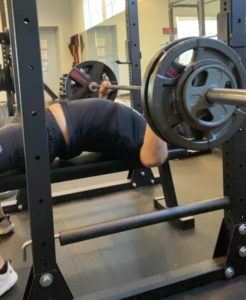 ot to around rep 5 or 6… on the first set. At the time my ego was hurt, but looking back I know it was a stepping stone that led to much greater things. Over the years, I’ve done countless repetitions of chest press using many different pieces of equipment and each time I go back, I’ve refined and worked on my technique.
I saw some initial progress over those first months/years but it wasn’t until I began focusing on powerlifting style training of moving heavier weight for lower number of reps specifically on squats, deadlifts, and bench press, that I really dialed in my focus on technique to move the weight efficiently as well as safely.
During that time, I was lucky enough to see great leaps in all 3 major lifts, with my most notable being in the Barbell Bench/Chest Press. Thanks to a few simple cues I had learned through Twitter, Instagram, and trial and error, I found these four tips to be the biggest difference makers in seeing my strength increase, as well as the overall health of my joints and body start to improve.
If you’re having trouble breaking through a plateau or want to make sure you’re keeping your form in check and safe, try implementing 1 or more of these cues and watch your Chest Press begin to skyrocket!
1. Maintain 5 points of contact at all times with a slight arch to your back — Head, Shoulders, Butt, Left Foot, Right Foot.
Maintaining contact with the bench, seat, ground, etc with the 5 points mentioned above ensures you’re able to create the most stable platform in which to perform the movement. You’ve rooted your body down to provide stability under the weight when you go to move it.
When attempting heavier weights as you progress, don’t forget to press your feet into the ground. The leverage you can create from your lower body can transfer up into your shoulders, upper back, and chest to help you press through tougher reps as you get stronger!
2. Keep your wrist in line with your forearm — The weight should be sitting in the crook of your thumb, not the top of the palm
When performing resistance training, one of the best ways to maintain stability in a movement is called “joint stacking”. It’s the process of ensuring that the joints you’re using are in alignment. The body craves alignment and moving in straight lines. This cue focuses on the wrists. Often when doing a chest press movement, I see people resting the bar higher in the palm, forcing their wrist to bend backwards. With lower weights that may not be a problem, but as you get stronger and move heavier weights, you may be adding unnecessary stress to the wrists. By resting the bar in the crook of your thumb at the base of your palm keeps the wrist in line with your forearms and eliminates any stress, keeping your wrists healthy and strong.
3. Don’t let elbows flare out at 90 degrees — Keep elbows tucked at a 45-60 degree a ngle from the body
Common misconception, bred by technique used in push ups that have transferred to other chest pressing movements, keeping your arms up high with elbows at a 90 degree angle from the body is not an optimal position for pressing movement. The elbows high in this position put a lot of undue stress on the shoulder muscles. Similar to the wrist in the previous cue, we want to make sure we alleviate as much stress on the joints as possible. This simple trick involves just tucking the elbows down closer to the body somewhere between a 45-60 degree angle. This lessens the impact on the shoulder and maintains focus of the pressing movement in the chest muscles for a strong press away from the body!
4. Pinch your shoulder blades together — don’t let them loosen up and rotate forward as you press.
Many shoulder injuries from chest pressing movements can be mitigated by this simple technique cue. As you’ve noticed, one of the best things you can do is maintain stability throughout the entire body. As you set yourself up under the bar or on the bench, squeeze your shoulder blades together and dig them into the bench. This is the position they should stay in during the entire lowering and pressing of the weight. Too often, when we press the weight away, our shoulder blades rotate forward around the rib cage. When this happens, our stability in our upper back is gone. This is when shoulder injuries commonly occur. Keep the shoulders pinned back and press through the chest and you should be golden.
As you continue to get better, you’ll refine and dial in your technique more and more. But these are the pillars that got me going and heading toward my own PRs and have helped my clients reach new heights and avoid recurring injuries.
Chest press is a staple exercise in the programming of pretty much any goal you’re working toward and these tips can help you get the most out of each training session.
If you’re frustrated the lack of progress you’re seeing and ready to break through plateaus and build a bigger, stronger self, head over to my client application let’s connect to create your best self today! I am taking clients to join my Online Training Program designed to help men and women build roughly 2″ of lean, toned, strong muscle in just 60 days! https://www.alwayshungrypt.com/client-application